Content from myastrophotography.com!
Beginning Astrophotographer Terms
This a list some of the more common celestial terms and objects that you may wish to learn how to find, look at with your telescope and eventually create an image for.
Asterism -is a clear, recognizable pattern or a shape found in the sky that is formed by a group of stars that is smaller in area than a constellation.
Comet – is a small celestial body composed of ice and dust and can be found orbiting the Sun on an elongated path. When a comet’s orbit is closere to the Sun, a long gas and dust tail is produced due to evaporating ice.
Conjunction – is the moment when two celestial objects can be found very near to each other in the night time sky.
Constellation – is any one of 88 official star patterns. Most are seen either in the summer sky or winter sky.
Double Star – is when two stars appear close together in the sky. Some are just chance alignments as seen from Earth, Others are binary systems where stars will orbit each other.
Galaxy – is a huge collection or gathering of stars, gas,and dust that gravity binds together.. Galaxies are categorized by their shape: spirals, barred spirals, and ellipticals. About 75% of the brighter galaxies we see in the night sky are are spirals.
Globular Star Cluster – is a tightly-packed spherical cluster that may have up to a million older stars. Globular clusters are found in a halo that surrounds the Milky Way Galaxy.
Light-year – is the measurement term used to describe the distance that light travels in one year. One light- year is equal to six trillion miles. With the vastness of the known universe, distances to celestial objects are measured in light-years.
Lunar Eclipse – is when the Earth’s shadow crosses the face of the Moon. This causes the Moon togradually darken, and then lighten over the course of an hour or two. A partial lunar eclipse is when due to the location part of the moon is covered by the Earth’s shadow. This can be seen with the naked eye.
Magnitude – is a number used to describe the level of brightness of a each star giving a way to measure the relative brightness. A first magnitude star is the brightest category and is about two and a half times brighter than a second magnitude star. About 20 stars are considered first magnitude . Human eye can typically see stars as faint as sixth magnitude without a telescope
Messier Object List – is a master list of 110 star clusters, nebulas, and galaxies that were compiled by Charles Messier , who was an 18th century comet-hunter. On star maps, you will find they are specified by the letter “M” followed by the object number. For example, the Orion Nebula would be listed as M42.
Meteor – is a bright streak of light in the sky that is produced by a piece of debris called a “meteoroid.” Traveling at a high rate of speed, it will burn up as it enters Earth’s atmosphere Meteors are commonly referred to as “shooting stars,” even though they are not even close to being a star.
The Moon – is 239,000 miles from Earth and is its only natural satellite. The Moon revolves around the Earth every 27.3 days and since it also rotates once every 27.3 days, we never see its far side. The Moon’s phases are based on its location relative to the Earth and the Sun.
Nebula – is a cloud of gas or dust in space. “Reflection” nebulas, are those where starlight reflects off the nebula’s dust.. “Emission” nebulas, are where the cloud itself emits light because its atoms are affected by a lot of nearby hot stars. Nebulas are essentially giant star-forming factories.
NGC Object List – is the “New General Catalog.” which is a list of deep sky objects first published in 1888 For the most part, NGC celestial objects are fainter than the Messier objects.
Open Star Cluster – is a group of a few hundred stars, bound together by gravity, and moving through space together. Open star clusters are generally found closer to Earth than the globular clusters. These stars are considered to be much younger.
Opposition – is the point in a planet’s orbit when it appears to be opposite the Sun. When a planet is in its opposition point, it can be seen in the night sky from dusk till dawn.
Planetary Nebula – is a shell of gas that late in the life of a star will be puffed off by the star life. It sometimes looks like a ring, as if the gas is wrapped around a central star.
The Planets – According to the International Astronomical Union the definition is a spherical object orbiting the Sun with sufficient mass to have its own gravity, and a clear neighborhood around its orbit. There are 8 planets in our solar system: Mercury, Venus, Earth, Mars, Jupiter, Saturn, Uranus, and Neptune. Pluto is now considered a “dwarf planet.” Other dwarf planets include a newly discovered object called “Eris” found in the Kuiper Belt beyond Pluto and a former asteroid called “Ceres.”
Solar Eclipse – is a rare celestial event that happens whenever a New Moon passes directly between the Sun and the Earth. Solar eclipses can be total or partial. Total eclipses occur when the Moon covers the entire disk of the Sun. These should not be observed with the naked eye.
Stars – are enormous spheres of hot gas when hydrogen gas is fused to form helium. This is what generates light and energy deep within their cores. The temperature of a star varies with its color. Blue-white stars are the hottest, yellow-orange stars are moderately-hot, while red stars are the coolest. The closest star to Earth is our Sun( 93,000,000 miles) which is a moderately-hot yellow- orange star, whose surface temperature is about 11,000°F. The next closest star is over 4 light-years away, and.is called Alpha Centauri.
Sunspots – are dark, highly magnetized blemishes on the surface of the Sun,they are in reality cooler areas, about 1,500 Celsius degrees cooler than the rest of the Sun’s surface. An average sunspot is at as big as Earth. Some can grow to be up to10 times the size of the Earth.
Terminator – is the line separating sunlit reflection of day and shadow of night on the surface not the Moon or on a planet.
Transit – is an when Mercury or Venus (inner planets) passes directly in front of the Sun. With a properly filtered telescope, the planets own disk can be seen against the solar background as it transits or crosses the Sun’s disk. Transits are relatively rare occurrences.
Astrophotography How-To Tutorial: Part I – Choosing an object
The very first thing we have to do when we start an astophotography is to choose the object. We have to know what are benefits of our equipment, what we are planning to capture, what is FOV (field of view) of our telescope and camera, how “deep” our system goes and so on. Let’s take a look at some of this questions.
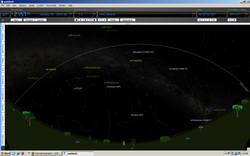
When we are deciding which object we will be capturing we can help ourselves with different astronomy software. They display imaginary sky and we can take a walk into nigh sky, choosing the objects, checking the rising, setting, magnitude, distance, … All this parameters are important when we are selecting the target for astrophotography.
There is a lot of different programs available on the web for astronomy. Some are free and others are paid. Here are some of them:
In this tutorial I will be using Starry Night. It is paid but it offers endless of useful options like FOV and has really a huge database of objects.
First of all we have to know what type of object is appropriate for our astrophotography setup. The predispositions for deep-sky astrophotography are:
- Telescope of telephoto lens
- Mount for tracking that tracks very accurate (under 2″ of error) or has option of auto-guiding
- DSLR or CCS camera with remote control of exposition.
- In Starry Night we put the parameters in the the section Equipment.
- Then we select FOV of our telescope and camera. The program displays us the rectangle that out astrophotography setup “sees”.
- Make sure that object is in the field of view at least 3 hours in the total darkness. It has to be at least 15-20° above the horizon all the time of the capturing. Make sure that you have specified your date/time and location accurately!
- Make sure that object roughly fits to the field of your telescope’s view. The rectangle that we have specified before helps us at this step. Make sure that it is not too small – it doesn’t make any sense if you are photographing a very small planetary nebula at 600mm of focal length.
- Make sure that it is not too dim. Almost all the objects from Messier catalogue are OK, and all the bright objects from NGC makes good target as well. If the object is dimmer than 10th magnitude then bigger telescope then 8″ is recommended.
- If you don’t have GoTo or it’s unreliable then make sure that you are able to find the object in the night sky. Help yourself with bright stars, print the carts out.
- If you are using german equatorial mount then make sure that object doesn’t pass the meridian during the planned time of capturing.
And here we are. We have the object.
Next time we will take a look at the conditions in the athmosphere that affects to the astrophotography – the weather, seeing, transparency and more.
The Great Galaxy in Andromeda
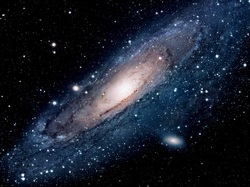
In the nights from 20th to 21st and 21st to 22nd August I have been capturing the Great Galaxy in Andromeda. I used my 8″ f/4.5 Newton which means 900mm of focal length and too small FOV to get the entire galaxy into one frame so I decided to make a mosaic. I spend the first night for the right part and second for the left part of the image. I combined them in Photoshop. All other data about image are:
Object: M31 and M32 (Andromeda Galaxy)
Date and Location: 20. and 21. 8. 2009, Mali Orehek, Slovenia
Exposition: 2×1 mosaic: 30 x 5min and 36 x 5min
Camera: Canon 350D, Baader mod., ISO 800, RAW
Optics: Orion Optics Europa 20cm f/4.5
Mount: Vixen GP-DX SS2K
Autoguiding: SW 80/400 with QHY5
Processed in: Iris, Ps
For The Backyard Hobbyist and Budding Astrophotographer
From the first time someone points out the Big Dipper in the summer sky, and how it points to the North Star, the fascination with the night sky begins. Planetariums are always popular attractions and eclipses and shooting stars are newsworthy. How many people named their children Hailey the year Haley’s Comet came through?
Most people do not even think about backyard, night time photography, assuming it is only for the serious photographer with all sorts of expensive equipment. Astrophotography may have a fancy name, but it is a past time that is fun, and can be started with just a digital camera and a tripod. The tripod can even be a home-made adaptation, the camera can be your common digital point-and-shoot camera! You do not need a telescope to get started with taking pictures of the night sky, called night imaging. With a little practice, anyone can learn to take beautiful and pleasing celestial pictures.
There are four levels or classes of astrophotography. Here is a quick overview Each one will be discussed in greater detail later on. The levels classifications begin with the simplest, using the least amount of equipment and go to the most sophisticated, using the most expensive equipment.
Astrophotography For The Backyard Hobbyist
You are a beginner astrophotographer if:
-You enjoy keeping track of some of the things in the night sky
-You had a night sky poster over your bed that you bought yourself and was not a gift from well meaning Aunt Matilda so your mother made you put it up there
-You go out an watch when you find out there is an eclipse, or three planets lining up in a row, or when a once in a lifetime comet or meteor is scheduled to go by
-However: the only camera setting you use is Auto
-However: the only telescope you ever used is one you hold in both hands and move the eyepiece in and out to focus
You can be sure that any of the beautiful celestial images you see online, or in astronomy books were probably one of a hundreds of images taken, each one trying different settings, and minor adjustments here and there until the perfect shot was found. This is the way of an astrophotographer!
With the digital camera, you instantly see if your image works, and can delete it and try again with minor adjustments here and another one there. Over time, you will learn the best settings to begin your night time imaging sessions with, but to help you out, there is a discussion of each of the three levels of astrophotography that are best suited for a back yard hobbyist. There will be some photography tips along with some initial camera setting ideas to use as a starting point. It might be wise to include bug spray in your equipment list!
Deep Space Objects
You use an entirely different approach to astrophotography when you want to capture images of objects further away and way and out of the range of the naked eye. The Great Orion Nebulae is one of the more famous of these objects.
Deep sky objects logically are very faint as they are much further away than the planets. This means that the light sensors will need to collect information over a much longer period of time time before the celestial object will be able to be seen in a photograph. This can be difficult with point-and-shoot cameras as the maximum exposure time is 60 seconds. The DSLR camera will be better suited for gathering images of these deep sky objects. This is a sign of a very serious hobby, indeed.
The beginner should not despair or go into serious debt at this level. There are plenty of celestial objects that can be photographed successfully using the point-and-shoot camera and eye-piece projection techniques. You will need to be sure to have a guidescope or off-axis guider, as explained earlier, that uses a GPS technology to keep an image in the center of the eyepiece of a long time thus letting you apply some more sophisticated imaging techniques.
Insight into Low-cost, Non-technical Methods for Celestial Objects at Great Distances-
You will have to find a location for this effort that has as dark a sky as possible. This will give you the best chance for getting a photograph of these fainter or deep sky objects as there will be some contrast to work with between the dark sky and the celestial object. One trick is to use the New Moon phase when the sky is naturally darkest. If you live in an area with high light pollution, you might want to find a friend or vacation spot with darker skies.
Once you have a good location, you use your telescope with the camera attached to the eyepiece. When you have found the location of the celestial object you were looking for, and focused it and set the tracking, you tehn will go an .adjust the cameras settings as described below. This will give you the best light-gathering options
• Sensitivity – ISO 400, SHQ (Super High Quality) setting, Macro or Infinity setting,
• Exposure range – 60 seconds,
• Aperture – f2.8 or lower.
• Set self-timer for a ten second delay to avoid any camera shaking possibilities
• Optional: Add a Barlow lens to the eyepiece in front of the camera. This lens only works with the brighter objects as it doubles the magnification of any eyepiece attached to the telescope. It will just make the fainter objects dimmer.
The two primary challenges of deep sky imaging with eyepiece projection:
“star trailing” and “vignetting.”
The Seven Points To Remember About Astrophotography
#1: The more you magnify a celestial object, the field-of-view becomes narrower.
#2: A wide field-of-view will require less tracking with a telescope to pinpoint an celestial object than a narrow field-of-view.
#3: Even though your camera sensitivity will increase at higher ISO settings (ISO 400 and ISO 800), the graininess or “noise” is also increased.
#4: Light pollution or atmospheric turbulence is worst near the horizon. Plan night time imaging sessions when the objects appear high in the sky.
#5: Detailed and vivid lunar images are clearest during the quarter moon phase.
#6: Use the moons “terminator line,” the light dark shadow line, to photographs cratered terrain with some amazing 3-D detail!
#7: Highest quality deep space images are taken when the sky is darkest. The period just before the moon rises, or during the New Moon phase are two excellent times.
The theme for the budding night imaging hobbyist is practice and perseverance create proficiency. Imagine how time consuming this would have been with 35mm film! The digital camera opens the doors for many more people to get involved in photographing the interesting objects found in the night sky.
The more you practice, you should be able to see the improvements, which will provide the motivation to continues on and create some of the most beautiful images you can imagine.
If you choose to advance to the astrophotography techniques levels using a telescope it will be helpful to first practice and enjoy just plain stargazing without any imaging . Learn to use the telescope and its features and learn to read the star charts, maps and get some good astronomy guidebooks. Make sure you have some pictures other people took to use as a guide when identifying what you find. By taking the time to have a better understanding of the night time sky, you will be able to make better decisions when beginning your astrophotography adventure.
This hobby can be a lot of fun, and is easily one that can be shared with others. Star gazing and imaging parties on key dates when certain celestial objects are in the right spots can be an enjoyable way to learn new tips and share your enthusiasm. Then again, a nice summer evening in your back yard, looking for Saturn’s rings can be a relaxing way to wind down at the end of a long day.
